Thursday, March 31, 2016

CPF - Rose Petals

Hi everyone! It's another Color Play Friday!

I must say that this is quickly becoming one of my favorite weekly rituals. Every week I look forward to the new photo of the week. Then I get to play around with it and I try to finalize my palette/bundle by Wednesday. When Friday rolls around I eagerly check everyone else's bundles. Monday comes and it starts all over!

If you are new to Color Play Friday (CPF), it is a fun weekly challenge hosted by Trina from In an Otter Life and Lorinda from Laurel, Poppy and Pine. Each week they select one of their photographs and then everyone creates a palette and a fabric bundle based on the photo.

It fun and easy and if you are interested in participating, just go to Trina's Color Play Friday page or Lorinda's Color Play Friday page for more information!

This week's photo is called Rose Petals. 


Lorinda supplied the photo for this week. These petals came from the rose bushes in her yard. Apparently they're not just pretty, they're edible too! 

This is what I came up with for the week.


I had a hard time deciding if I wanted to go monochromatic or if I wanted to include that teeny tiny bit of green accent color. Do you see that little green spec of a leaf in the lower right of the photo? I actually did make a second bundle that had a few green tones in it; but in the end, I felt that this monochromatic bundle felt "truer' to the original photo. Plus, I really like the gradation of color. 

I "shopped' from Stash Fabrics and Hawthorne Threads this week. 

My Fabrics:


Don't forget to check out all the other participants this week:

Hostesses:

Participants:
Chrissy @ Love Hazel Honey

========

Until next time!
- Sarah


Sunday, March 27, 2016

OBX Sunrise - 2016 Paintbrush Studio New Block Blog Hop!

Welcome to Day One of the 2016 Paintbrush Studio New Block Blog Hop!


I'm so excited to be part of this wonderful block hop sponsored by Paintbrush Studio and hosted by Yvonne of Quilting JetGirl, Cheryl of Meadow Mist Designs, and Stephanie of Late Night Quilter! Over 30 bloggers are designing a new quilt block using the same Fat Quarter bundle of Painter's Palette solids by Paintbrush Studio. That's over 30 new designs in just 3 days!

The hosts of this hop curated this gorgeous bundle and are calling it "Ocean Sunrise." 


Paintbrush Studio has generously supplied each participant with a Fat Quarter each of Midnight, Daydream, White, Peach, Coral, and Bordeaux. Each participant was required to design a 12 1/2" by 12 1/2" (unfinished) quilt block that included at least three of the fabrics from the bundle. 

Presenting...

OBX Sunrise


General Notes:

·         OBX Sunrise is a 12” finished (12 ½” unfinished) quilt block. The block is made up of two units (two END Units and one MIDDLE Unit.)
·         This block is made with Half Rectangle Triangles (HRT’s.) There are many ways to make HRT’s. Feel free to use your favorite method but PLEASE NOTE that the cutting measurements given are for the method outlined in this tutorial.
·         ¼” seams are used throughout the construction of this block.
·         This block is named for the beautiful sunrises that can been seen from the Outer Banks (OBX) in North Carolina.

Materials Required:

·         1 – FQ (fat quarter) each, Painter’s Palette solid cotton fabric by Paintbrush Studio in Peach, Coral, Bordeaux, Midnight, and White.
·         Basic sewing supplies (sewing machine, thread, scissors, cutting mat, ruler, rotary cutter, marking pen or pencil, etc.).

Cutting Instructions:
         
          From Peach:
Cut 2 – 3” x 5” rectangles

          From Coral:
Cut 2 – 3” x 5” rectangles

          From Bordeaux:
Cut 2 – 3” x 5” rectangles

          From Midnight:
Cut 2 – 1 ½” x 12 ½” strips

          From White:
Cut 2 – 1” x 12 ½” strips
Cut 1 – 1 ½” x 12 ½” strip
Cut 6 – 3” x 5” rectangles


Half Rectangle Triangle Assembly:

**NOTE** This method yields 2 LEFT-facing HRT’s.

          Step 1:
Lay 1 White rectangle (3” x 5”) and 1 Peach rectangle (3” x 5”) side by side, keeping the White rectangle on the left.


**NOTE** If using prints, make sure the fabric on the left is WRONG side facing up and the fabric on the right is RIGHT side facing up.

Step 2:
Using a marking pen or pencil and a ruler, mark a dot ½” in from the TOP LEFT corner of the White rectangle. Mark another dot ½” in from the BOTTOM RIGHT corner of the White rectangle.


          Step 3:
Using a marking pen or pencil and a ruler, mark a dot ½” in from the TOP RIGHT corner of the Peach rectangle. Mark another dot ½” in from the BOTTOM LEFT corner of the Peach rectangle.


          Step 4:
On each rectangle, use a marking pen or pencil and a ruler to draw a sew line connecting the dots.


          **NOTE** Marked lines will not go directly through the corners.
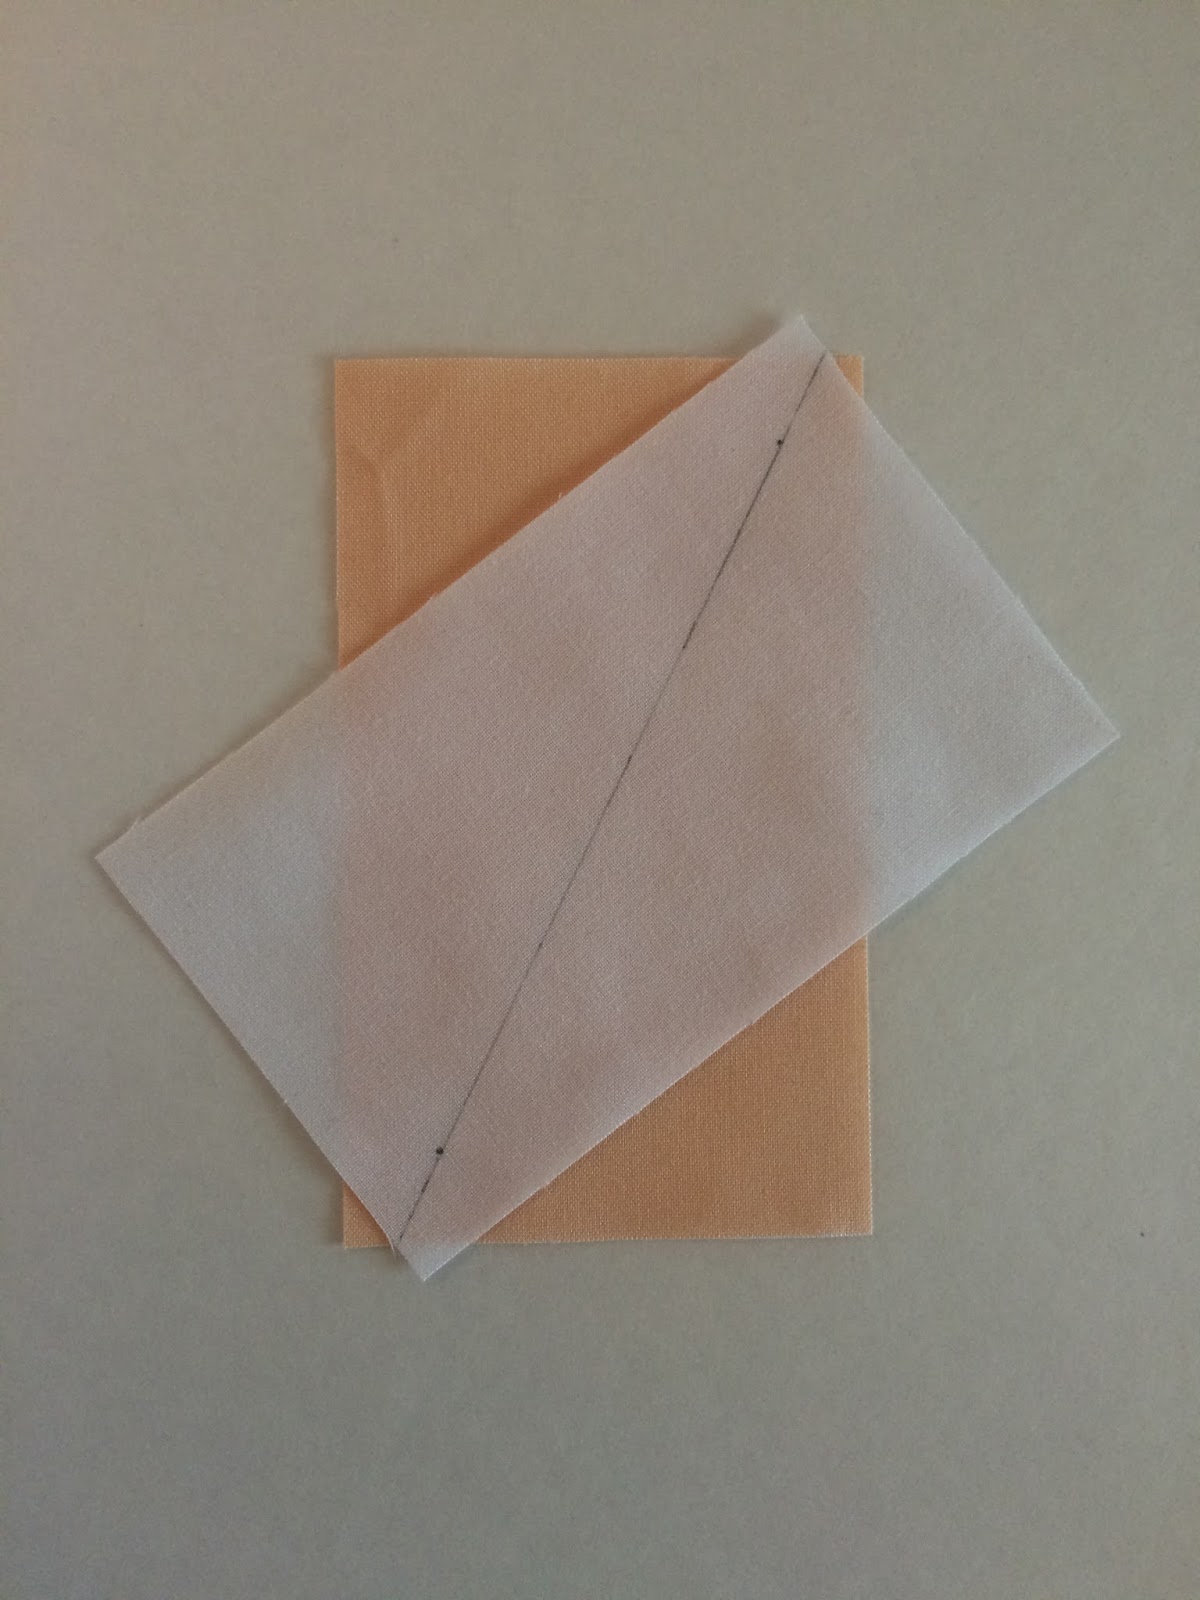
          Step 5:
Move the White rectangle on top of the Peach rectangle and rotate so the lines match up.
         

Step 6:
Pin to secure. Then sew a seam ¼” in from either side of the sew line.


          Step 7:
Use scissors or a ruler and rotary cutter and cut along the sew line.


          Step 8:
Open and press HRT’s to reveal two LEFT-facing HRT’s.


          Step 9:
Trim each HRT to 2 ½” x 4 ½”.
-      To trim HRT, line up the top of the diagonal line of the HRT with the ¼” intersection of the ruler and the bottom of the diagonal line of the HRT with the 2 ¼” and 4 ¼” intersection of the ruler.


-      Use a rotary cutter to trim the top and side of the HRT. Flip the HRT and line up the trimmed edges with the 2 ½” mark and the 4 ½” mark on the ruler.


-      Trim remaining sides.


Step 10:
Repeat Steps 1 through 9 with the remaining 5 White rectangles (3” x 5”), 1 Peach rectangle (3” x 5”), 2 Coral rectangles (3” x 5”), and 2 Bordeaux rectangles (3” x 5”). Yields 12 total HRT’s (2 ½” x 4 ½”) – 4 Peach, 4 Coral, and 4 Bordeaux.


End Unit Assembly:

          Step 1:
Sew together 2 Peach HRT’s, 2 Coral HRT’s, and 2 Bordeaux HRT’s as shown in the picture below.


          Step 2:
Repeat with the remaining 2 Peach HRT’s, 2 Coral HRT’s, and 2 Bordeaux HRT’s for a total of 2 End Units. Each End Unit should measure 4 ½” x 12 ½”.


Middle Unit Assembly:

          Step 1:
Sew together 2 White strips (1” x 12 ½”), 2 Midnight strips (1 ½” x 12 ½”), and 1 White strip (1 ½” x 12 ½”) as shown in the picture below. The Middle Unit should measure 4 ½” x 12 ½”.


Block Assembly:
         
          Step 1:
Assemble the block as shown in the picture below.


          Step 2:
Square up the block to 12 ½” x 12 ½” if needed.


========

I really love this block and I think it looks amazing on repeat!


I definitely want to make this one soon! I  hope you enjoyed this tutorial and if you make an OBX Sunrise block I would love to see it!

========

Be sure to check out the other participants in the 2016 Paintbrush Studio New Block Blog Hop!

Monday, March 28th
Host: Yvonne @Quilting Jetgirl
Jess @Quilty Habit
Silvia @A Stranger View
Cristy @Love You Sew
Kelly @Quilting It Out
Renee @Quilts of a Feather
Bernie @Needle and Foot
Terri Ann @Childlike Fascination
Chelsea @Patch the Giraffe
Mary @Quilting is in my Blood
Diana @Red Delicious Life
Sarah @123 Quilt - YOU ARE HERE!

Tuesday, March 29th

Host: Cheryl @Meadow Mist Designs
Kim @Leland Ave Studios
Andrea @The Sewing Fools
Cassandra @The (not so) Dramatic Life
Stephanie @Quilt’n Party
Irene @Patchwork and Pastry
Tish @Tish’s Adventures in Wonderland
Abby @Hashtag Quilt
Sarah @Smiles Too Loudly
Carrie @The Zen Quilter
Wanda @Wanda’s Life Sampler

Wednesday, March 30th

Host: Stephanie @Late Night Quilter
Vicki @Orchid Owl Quilts
Shelly @The Carpenter’s Daughter Who Quilts
Amy @13 Spools
Geraldine @Living Water Quilter
Robyn @Hoops & Thimbles
Jan @The Colorful Fabriholic
Sharla @Thistle Thicket Studio
Jinger @Trials of a Newbie Quilter
Kathryn @Kupitis
Jane @Jolly and Delilah
Josi @Avocado Quilts
Deanna @Stitches Quilting
Lori @SewPsyched!
========

Linking up with:

Main Crush Monday @ Cooking Up Quilts
Tips and Tutorials Tuesday @ Late Night Quilter
Sew Cute Tuesday @ Blossom Heart Quilts
Linky Tuesday @ Freemotion by the River
Let's Bee Social @ Sew Fresh Quilts

========

Until next time!
- Sarah


Thursday, March 24, 2016

Color Play Friday - Dry Sparkling Company

Hello and welcome!

It's Color Play Friday again! I had so much playing along last week that I had to join in again.

For those of you who are new to Color Play Friday (CPF), it is a fun weekly challenge hosted by Trina from In an Otter Life and Lorinda from Laurel, Poppy and Pine. Each week they select one of their photographs and then everyone creates a palette and a fabric bundle based on the photo.

This week's colorful photo comes to you courtesy of Trina. She took it while at Dry Sparkling Company in Seattle.


This photo is full of gorgeous colors! Without further ado, here is my palette/bundle for the week.


I struggled less with this photo than the one last week. I think maybe it's because the process gets easier the more you do it. Maybe?

I picked all my fabrics from Hawthorne Threads this week. As soon as I saw that floral print I knew I wanted to make it my feature fabric. Then I pulled some geometric and blender fabrics. I really like the way they contrast yet complement the floral print.

Overall, I'm really pleased with my bundle this week. And, of course, now I want all those fabrics! Lol!


My Fabrics:


Don't forget to check out the other participants this week! It's so much fun to see what everyone comes up with.

Hostesses:
Trina @ In an Otter Life
Lorinda @ Laurel, Poppy and Pine

Participants:
Steph @ Shimmy and More
Bethany @ Sew Not Perfect
Chrissy @ Love Hazel Honey
Jennifer @ https://www.flickr.com/photos/137552833@N07/albums/72157663924029514

If you want to join in next week just go to Trina's Color Play Friday page or Lorinda's Color Play Friday page!


Until next time!
- Sarah

Thursday, March 17, 2016

Color Play Friday! - Starburst

Hi, everyone!

Welcome to Color Play Friday! I'm so excited because this is my first week playing along with Trina from In an Otter Life and Lorinda from Laurel, Poppy and Pine, the masterminds behind Color Play Friday.

For those of you new to Color Play Friday (CPF), it is a fun weekly challenge started by Trina and Lorinda in September 2015. Each week they select one of their photographs and then everyone creates a palette and a corresponding bundle of fabric based on the photo. Fun, right?!

** GIVEAWAY ALERT ** This week Stash Fabrics is teaming up with Trina and Lorinda to give away a bundle of fabric! Go to In an Otter Life and/or Laurel, Poppy and Pine to learn more!

Here is my bundle for the week.


I was immediately drawn to the beautiful colors on the rim of the bowl and I knew I wanted to incorporate them into my palette. I mean, just look at those blues! I also wanted to use the yellows but they were all just a bit too ocher. Lol. I just realized that it's a natural tendency for me to gravitate toward those colors. Blues and yellows will get me every time.

The whole process was a lot of fun! I don't usually go looking for pinks and corals so I was a bit challenged this week. But I think that's the whole point of this game - to challenge ourselves.

My fabrics:


It's so much fun to see the palettes that other people pick from the same photograph. Be sure to check out the other participating blogs this week!

Trina @ In an Otter Life
Lorinda @ Laurel, Poppy and Pine
Sarah @ Sarah Goer Quilts
Yvonne @ Quilty Dream
Christina @ Love Hazel Honey
Mindy @ Quilting Mayhem
Bethany @ Sew Not Perfect


Want to join in next week? Go to Trina's Color Play Friday page or Lorinda's Color Play Friday page to learn more!

Until next time!
- Sarah

Friday, March 11, 2016

Urban Jungle Looking Glass - A Quilt Top Finish

I don't know how this keeps happening. I think I'm keeping up with blogging and then WHAM! A whole month goes by and I haven't posted a thing. Well, okay... I do know how it happens. Life gets busy, chores and "adulting" needs to happen, and blah blah blah. Also, I rarely do any blogging or sewing/crafting in the evenings and on weekends because I like to spend that time Mr.123quilt. Awwww.....

Okay, let's get to the real reason I'm posting today. I have a another flimsy finish to share!!!

approx. 54" x 64"

This is a fun pattern called Looking Glass by Cheryl of Meadow Mist Designs. Does that name sound familiar? I blogged a few weeks ago about my finished top for her Midnight Mystery Quilt Along

(SIDE NOTE: This week Cheryl posted a parade of quilts from the QAL. Go check it out!)

I actually won this pattern in a giveaway back in 2014! It's always been on my to-do list (you know, the long-term one) but I just never found any fabric that I wanted to use in this pattern. Until a few weeks ago that is.


I was browsing around Tuesday Morning and found this great charm pack and I immediately thought of the Looking Glass pattern. I knew I had finally found the perfect fabric for the pattern. Also, $1.99 for a pack of 32 charms? Yes, please! Girl is on a budget!


The brand is Creative Cuts which is manufactured by Fabric Editions. I think this is the same manufacturer that provides the fabric for Target and maybe the roll-up fat quarters at Jo-Ann's. I had never used this brand before so I wasn't sure about the quality. But at that price I had to give it a go. Worst case scenario - I could sew it up as a charity quilt. Nope. That's not going to happen. As it turns out, I really love this quilt. Like all the hearty eyes and exploding heart emojis LOVE. Selfish Sarah strikes again. This one is mine. No relatives are going to snatch it. Mine, I tell you!


The fabrics give me a funky urban jungle vibe. Does anyone else get that? Normally I don't go for animal prints but I love that neon green leopard print. And the blue zebra print! Again with the hearty eyes. So, the biggest drawback to these charms was that they were all about 1/8" to 1/4" larger than a standard 5" charm square. I had to trim them all down. Bummer. That added a few extra hours to my total time.

This quilt was actually really fast to put together. I think it took about four days of slow, distracted sewing. If you hustled I think you could make this pattern in one day. Which is pretty cool. Great for beginners and experienced quilters who fun something quick and fun.

Until next time!
- Sarah

========

Linking up with:

Finish it up Friday at Crazy Mom Quilts
Whoop Whoop Fridays At Confessions of a Fabric Addict
TGIFF at Dizzy Quilts
Fabric Frenzy Friday at Fort Worth Fabric Studio