I normally work on one project at a time. I'm a mono-quilter. I relish each step of the process and I enjoy taking things one step at a time from conception to completion... or maybe just to completion of a quilt top. (I rarely quilt and finish my tops, but that's another post.)
So, I've found myself in a bit of an awkward place. I'm working on four different projects at once! I was cutting fabric for one project and it was just too easy to cut fabric for a second project. Then one thing led to another... Now, I've got four projects in various states of completion.
It's not so bad, really, except that my work space is seriously crowded and sometimes I don't know what to work on for the day. Indecision, I know thee well.
First up is my Dutch Darlings quilt top. Dutch Darlings is a new pattern that I'm testing for Cristy Fincher. All I have so far is my fabric pull for the project.
I'm not behind... yet. I will be if I don't get a move on! Seriously, I should be working on this one now instead of writing up this post. I can't decide if I'm just being a responsible blogger or procrastinating. Probably the latter.
Next, I've had this pull of batiks out on my table for over a month!
I have a plan for these and the background fabric is all cut out already. That's why I'm counting this as a WIP rather than just a project pull. It also counts as a WIP because it's taking up space on my work table.
I'm also working on this fun quilt block.
It's for a quilt pattern called Adam's Rib, designed by Toby Jacobson for Fons and Porter. I modified the pattern slightly to fit my needs. Anyway, keep an eye out for this one; I'm excited about it.
Last, I'm working on a HRT (Half Rectangle Triangle) quilt top using these fabrics plus some black and white.
I wish I had some pictures of the HRTs to share but at this time of year the best lighting in my work space happens right around dinner time. Which means I'm always too busy at that time to take photos.
So, yeah, four projects at once. I feel like I'm all over the place. Do you work on multiple projects at once or are you a one-at-a-timer (a mono-quilter) like me? If you do work on lots of stuff at once how do you keep track of it all?
========
Linking up with:
Let's Bee Social at Sew Fresh Quilts
========
Until next time!
- Sarah
Showing posts with label Let's Bee Social. Show all posts
Wednesday, June 29, 2016
Sunday, March 27, 2016
OBX Sunrise - 2016 Paintbrush Studio New Block Blog Hop!
Welcome to Day One of the 2016 Paintbrush Studio New Block Blog Hop!
I'm so excited to be part of this wonderful block hop sponsored by Paintbrush Studio and hosted by Yvonne of Quilting JetGirl, Cheryl of Meadow Mist Designs, and Stephanie of Late Night Quilter! Over 30 bloggers are designing a new quilt block using the same Fat Quarter bundle of Painter's Palette solids by Paintbrush Studio. That's over 30 new designs in just 3 days!
The hosts of this hop curated this gorgeous bundle and are calling it "Ocean Sunrise."
Paintbrush Studio has generously supplied each participant with a Fat Quarter each of Midnight, Daydream, White, Peach, Coral, and Bordeaux. Each participant was required to design a 12 1/2" by 12 1/2" (unfinished) quilt block that included at least three of the fabrics from the bundle.
Presenting...
OBX Sunrise
General Notes:
·
OBX
Sunrise is a 12” finished (12 ½” unfinished) quilt block. The block is made up
of two units (two END Units and one MIDDLE Unit.)
·
This
block is made with Half Rectangle Triangles (HRT’s.) There are many ways to
make HRT’s. Feel free to use your favorite method but PLEASE NOTE that the
cutting measurements given are for the method outlined in this tutorial.
·
¼”
seams are used throughout the construction of this block.
·
This
block is named for the beautiful sunrises that can been seen from the Outer
Banks (OBX) in North Carolina.
Materials Required:
·
1
– FQ (fat quarter) each, Painter’s Palette solid cotton fabric by Paintbrush
Studio in Peach, Coral, Bordeaux, Midnight, and White.
·
Basic sewing supplies (sewing machine,
thread, scissors, cutting mat, ruler, rotary cutter, marking pen or pencil,
etc.).
Cutting Instructions:
From
Peach:
Cut 2 – 3” x 5” rectangles
From
Coral:
Cut 2 – 3” x 5” rectangles
From
Bordeaux:
Cut 2 – 3” x 5” rectangles
From
Midnight:
Cut 2 – 1 ½” x 12 ½” strips
From
White:
Cut 2 – 1” x 12 ½” strips
Cut 1 – 1 ½” x 12 ½” strip
Cut 6 – 3”
x 5” rectangles
Half Rectangle Triangle Assembly:
**NOTE**
This method yields 2 LEFT-facing HRT’s.
Step
1:
Lay 1 White rectangle (3” x 5”) and 1 Peach
rectangle (3” x 5”) side by side, keeping the White rectangle on the left.
**NOTE** If using
prints, make sure the fabric on the left is WRONG side facing up and the fabric
on the right is RIGHT side facing up.
Step 2:
Using a marking pen or pencil and a ruler,
mark a dot ½” in from the TOP LEFT corner of the White rectangle. Mark another
dot ½” in from the BOTTOM RIGHT corner of the White rectangle.
Step
3:
Using a marking pen or pencil and a ruler,
mark a dot ½” in from the TOP RIGHT corner of the Peach rectangle. Mark another
dot ½” in from the BOTTOM LEFT corner of the Peach rectangle.
Step
4:
On each rectangle, use a marking pen or
pencil and a ruler to draw a sew line connecting the dots.
**NOTE**
Marked lines will not go directly through the corners.
Step
5:
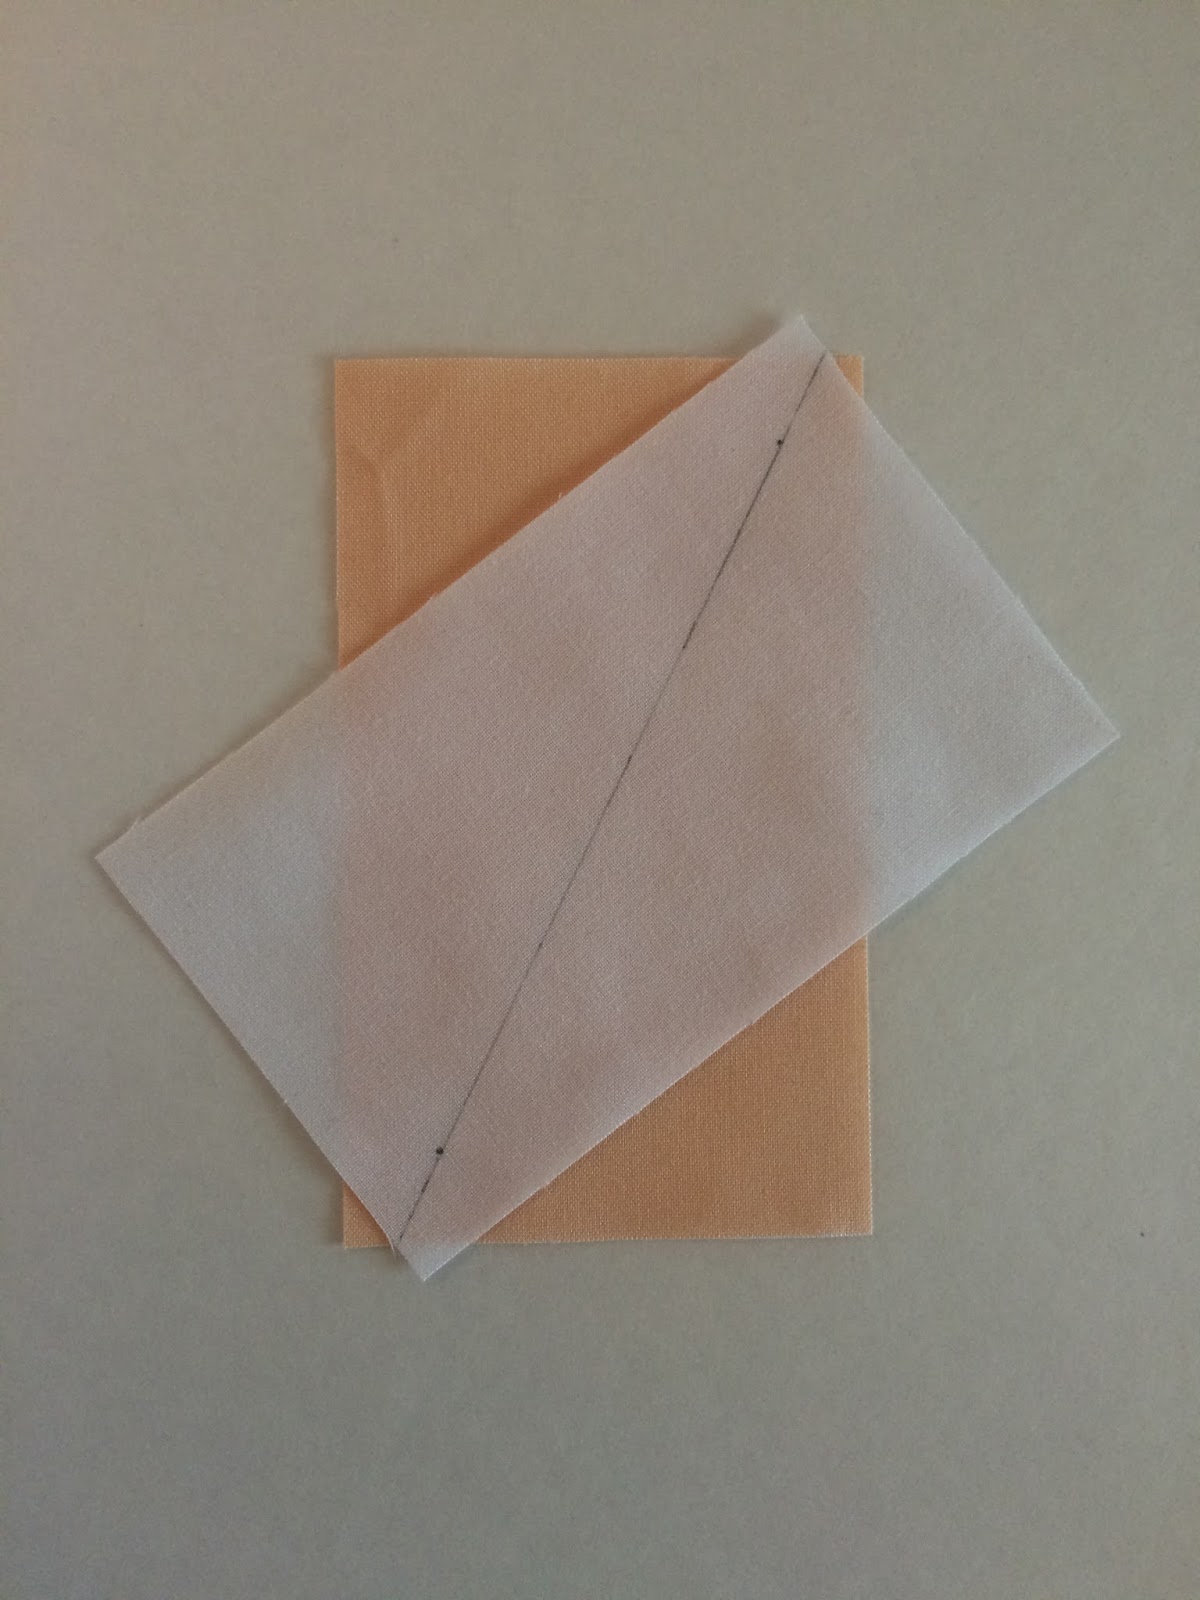
Move the White rectangle on top of the Peach
rectangle and rotate so the lines match up.
Step 6:
Pin to secure. Then sew a seam ¼” in from
either side of the sew line.
Step
7:
Use scissors or a ruler and rotary cutter
and cut along the sew line.
Step
8:
Open and press HRT’s to reveal two
LEFT-facing HRT’s.
Step
9:
Trim each HRT to 2 ½” x 4 ½”.
-
To trim HRT, line up the top of the diagonal
line of the HRT with the ¼” intersection of the ruler and the bottom of the diagonal
line of the HRT with the 2 ¼” and 4 ¼” intersection of the ruler.
-
Use a rotary cutter to trim the top and side
of the HRT. Flip the HRT and line up the trimmed edges with the 2 ½” mark and
the 4 ½” mark on the ruler.
-
Trim remaining sides.
Step 10:
Repeat Steps 1 through 9 with the remaining
5 White rectangles (3” x 5”), 1 Peach rectangle (3” x 5”), 2 Coral rectangles
(3” x 5”), and 2 Bordeaux rectangles (3” x 5”). Yields 12 total HRT’s (2 ½” x 4
½”) – 4 Peach, 4 Coral, and 4 Bordeaux.
End Unit Assembly:
Step
1:
Sew together 2 Peach HRT’s, 2 Coral HRT’s,
and 2 Bordeaux HRT’s as shown in the picture below.
Step
2:
Repeat with the remaining 2 Peach HRT’s, 2
Coral HRT’s, and 2 Bordeaux HRT’s for a total of 2 End Units. Each End Unit
should measure 4 ½” x 12 ½”.
Middle Unit Assembly:
Step
1:
Sew together 2 White strips (1” x 12 ½”), 2
Midnight strips (1 ½” x 12 ½”), and 1 White strip (1 ½” x 12 ½”) as shown in
the picture below. The Middle Unit should measure 4 ½” x 12 ½”.
Block Assembly:
Step
1:
Assemble the block as shown in the picture
below.
Step
2:
Square up the block to 12 ½” x 12 ½” if
needed.
========
I really love this block and I think it looks amazing on repeat!
I definitely want to make this one soon! I hope you enjoyed this tutorial and if you make an OBX Sunrise block I would love to see it!
========
Be sure to check out the other participants in the 2016 Paintbrush Studio New Block Blog Hop!
Monday, March 28th
Host: Yvonne @Quilting Jetgirl
Jess @Quilty Habit
Silvia @A Stranger View
Cristy @Love You Sew
Kelly @Quilting It Out
Renee @Quilts of a Feather
Bernie @Needle and Foot
Terri Ann @Childlike Fascination
Chelsea @Patch the Giraffe
Mary @Quilting is in my Blood
Diana @Red Delicious Life
Sarah @123 Quilt - YOU ARE HERE!
Tuesday, March 29th
Host: Cheryl @Meadow Mist Designs
Kim @Leland Ave Studios
Andrea @The Sewing Fools
Cassandra @The (not so) Dramatic Life
Stephanie @Quilt’n Party
Irene @Patchwork and Pastry
Tish @Tish’s Adventures in Wonderland
Abby @Hashtag Quilt
Sarah @Smiles Too Loudly
Carrie @The Zen Quilter
Wanda @Wanda’s Life Sampler
Jayne @Twiggy and Opal
Wednesday, March 30th
Host: Stephanie @Late Night Quilter
Vicki @Orchid Owl Quilts
Shelly @The Carpenter’s Daughter Who Quilts
Amy @13 Spools
Geraldine @Living Water Quilter
Robyn @Hoops & Thimbles
Jan @The Colorful Fabriholic
Sharla @Thistle Thicket Studio
Jinger @Trials of a Newbie Quilter
Kathryn @Kupitis
Jane @Jolly and Delilah
Josi @Avocado Quilts
Deanna @Stitches Quilting
Lori @SewPsyched!
========
Linking up with:
Main Crush Monday @ Cooking Up Quilts
Tips and Tutorials Tuesday @ Late Night Quilter
Sew Cute Tuesday @ Blossom Heart Quilts
Linky Tuesday @ Freemotion by the River
Let's Bee Social @ Sew Fresh Quilts
========
Until next time!
- Sarah
Wednesday, January 27, 2016
Jingle All the Way Quilt - A new WIP
Hey quilty friends!
I just thought I'd share my newest WIP with you today. I'm calling it "Jingle All the Way."
Yes... It's a Christmas quilt. I know what ya'll are thinking. "It's January! Christmas was last month!" True. But I like to think that instead of being a month behind on this quilt, I'm actually a whole 11 months ahead of schedule! Lol!
Okay, the real story is that I've been wanting to make a Christmas quilt for years. Every year though, I get bogged down with making homemade gifts or traveling and I never have the time to make one. So this year, the wonderful Mr. 123quilt got me a few charm packs of Jingle by Kate Spain for Moda for a Christmas present.
He is so good at listening to me and getting me thoughtful gifts. Actually, I think he was tired of hearing me talk about wanting to make this quilt. Haha! Anyway, I wanted to capitalize on my momentum for making this quilt and get started now rather than wait to start in the Fall. And, let's be honest, there's a good chance I won't be interested in making it then. Better to make it now while it's on my mind.
I'm sure you can tell from the first picture that this is going to be a simple HST quilt.
That is one BIG stack of triangles that needs to be trimmed. I wouldn't even tackle this quilt if I didn't have a Bloc-Loc ruler. It makes trimming HSTs so quick and easy! Incidentally, the ruler was also a gift from Mr. 123quilt. I believe it was for my birthday last year. Like I said, he's a good one for getting me gifts I want!
Anyway, I've spent the day chain-piecing (so relaxing for me!) and pressing my HSTs. I think I'll tackle the trimming tomorrow.
| Lots of chain-piecing |
So, that's it for now. I'll keep you posted on the progress.
========
Linking up with:
and
Wednesday, July 29, 2015
A New Baby Quilt for a New Baby!
I think I mentioned in my last post that I have a new niece! A new baby in the family means a new baby quilt is in order. Naturally.
This came together pretty fast. Which is a good thing because it needs to be done by Monday! As you can see I still need to sew my rows together. I'm hoping to do that as well as baste it this afternoon. I am not looking forward to basting because my back is still whack. This quilt is so small though that it shouldn't be too bad. It should end up about 30" x 40".
I think this will turn out to be a pretty sweet baby blanket for a little girl. I hope she likes it.
This quilt needs a name. Any suggestions?
- Sarah
========================================================================
Linking up with:
Wednesday, June 10, 2015
WIP Wednesday - Reverse Irish Chain
It’s been a busy week over here, what with the 2015 New Quilt Bloggers Blog Hop and all, but I did manage to find some time to work on my current WIP.
This fun little project is a pattern I call “Reverse Irish Chain” because, well, that’s what it is. The print fabric and the background fabric are inverted from a traditional Irish Chain. I started with this gorgeous fat quarter bundle of Utopia by Frances Newcombe. The colors are so rich and bright.
After I stared at the fabric for a while, and petted it for a little while more, I cut into it and put it up on my temporary design wall. I’m usually one for a “design bed” or a “design floor” but on special occasions I like to pull out the big guns and hang up some batting; cause I’m fancy like that.
It was pretty much standard Irish Chain patchwork from there; large squares and 9-patches, over and over.
I have a few more rows to add and I’m hoping I’ll have a finished top by Friday. I already have a few ideas for how I’m going to quilt this one.
That’s all for now!
========
Linking up with Freshly Pieced’s WIP Wednesday
And…
Subscribe to:
Posts (Atom)