
Hello and welcome to Day 2 of the 2016 Cloud9 New Block Blog Hop!

Many thanks to the hop hosts Yvonne @ Quilting Jetgirl, Cheryl @ Meadow Mist Designs, and Stephanie @ Late Night Quilter for all their hard work putting this hop together! I also want to give a HUGE thank you to Cloud9 for generously sponsoring the hop!


Cloud9 provided each participant with 5 fat quarters of their gorgeous, organic Cirrus Solids in Amazon, Sky, Shadow, Lilac, and Iris. With over 60 participants in this block hop, that means that over the course of three days you are going to get a ton of free block tutorials.
There are a few rules of course. Don't worry, they're for the block designers, not you! Each participant in the hop was asked to create a 12 1/2" (unfinished) quilt block using at least three of the five solids provided. Not too hard, right?

I had never worked with Cloud9 fabrics before this challenge. I have to tell you how impressed I am! They are made with 100% organic cotton and they are SO soft! Seriously, I think I annoyed Mr. 123quilt when I was making my block because every step of the way I made him feel how soft the fabric was.

Also, I freely admit to petting my block every time I walk by it. It's currently sitting on my ironing board waiting to be packaged up and shipped out to the hop hosts. They are going to take all the participant blocks and turn them into charity quilts. How awesome is that?!
Introducing... Berryburgh Block!
========
Berryburgh Block

A Quilt Block By: Sarah Smith from www.123quilt.blogspot.com
Featured in the 2016 Cloud9 New Block Blog Hop
General Notes:
- Berryburgh Block is a 12” finished (12 ½” unfinished) quilt block.
- ¼” seams are used throughout the construction of this block.
- This block is named for the entirely fictional but picturesque town of Berryburgh that is known for its wild berries that grow along the town's wooden fences.
Materials Required:
- 1 – FQ (fat quarter) each, Cirrus solids in Amazon, Sky, and Shadow.
- Basic sewing supplies (sewing machine, thread, scissors, cutting mat, ruler with a 45 degree angle mark, rotary cutter, marking pen or pencil, etc.).
Cutting Instructions:
From
Amazon:
Cut (2) 4”
x 4” squares
Cut (1) 4 ½” x 4 ½” square
From
Sky:
Cut (16) 2”
x 2” squares
From Shadow:
Cut (4) 4”
x 4” squares
Cut (1) 4 ½” x 4 ½” square
Cut (16) 2” x 2” squares
Half Square Triangle (HST) Assembly:
{Step 1} Using a
marking pen or pencil and a straight edge, draw a diagonal line on the wrong
side of 2 Shadow squares (4” x 4”).

{Step 2} Pair each
marked Shadow square (4” x 4”) with an Amazon square (4” x 4”), right sides
together.

{Step 3} With the
marked square on top, sew ¼” away from either side of the marked line. Do this
for both pairs.

{Step 4} Using
scissors or a ruler and rotary cutter, cut the sewn pairs along the marked line
and press open to reveal the HST unit. (4 total)


{Step 5} Trim each
HST unit to 3 ½” x 3 ½”. Line up the 45 degree angle line on the ruler with the
center seam of the HST unit to ensure accuracy when trimming.

Quarter Square Triangle (QST) Assembly:
{Step 1} Using the
HST method described above, make 2 HSTs from 1 Shadow square (4 ½” x 4 ½”) and
1 Amazon square (4 ½” x 4 ½”).
{Step 2} Trim the
HSTs to 4” square. Line up the 45 degree angle line on the ruler with the
center seam of the HST unit to ensure accuracy when trimming.
{Step 3} Using a
marking pen or pencil and a straight edge, mark a diagonal line on the wrong
side of 2 Shadow squares (4” x 4”).
{Step 4} Pair each
of the marked Shadow squares with a HST (4” x 4”), right sides together. Make
sure the drawn line goes in the opposite direction of the seam line of the HST.

{Step 5} With the
marked square on top, sew ¼” away from either side of the marked line. Do this
for both pairs.

{Step 6} Using
scissors or a rotary cutter and ruler, cut the sewn pairs along the marked line
and press open to reveal the QST units. (4 total)


{Step 7} Trim each
QST to 3 ½” x 3 ½”.
·
To trim accurately, find the midpoint of the
QST by taking the measurement of the unfinished unit and dividing by 2. (For
our 3 ½” x 3 ½” unfinished unit, this number is 1 ¾”.)
·
Find the intersection of this number (1 ¾”)
on your ruler. Place that point directly over the center point of your block,
aligning the 45 degree angle with one of the seam lines.
·
Trim the excess fabric on each side. Rotate
the block and repeat.

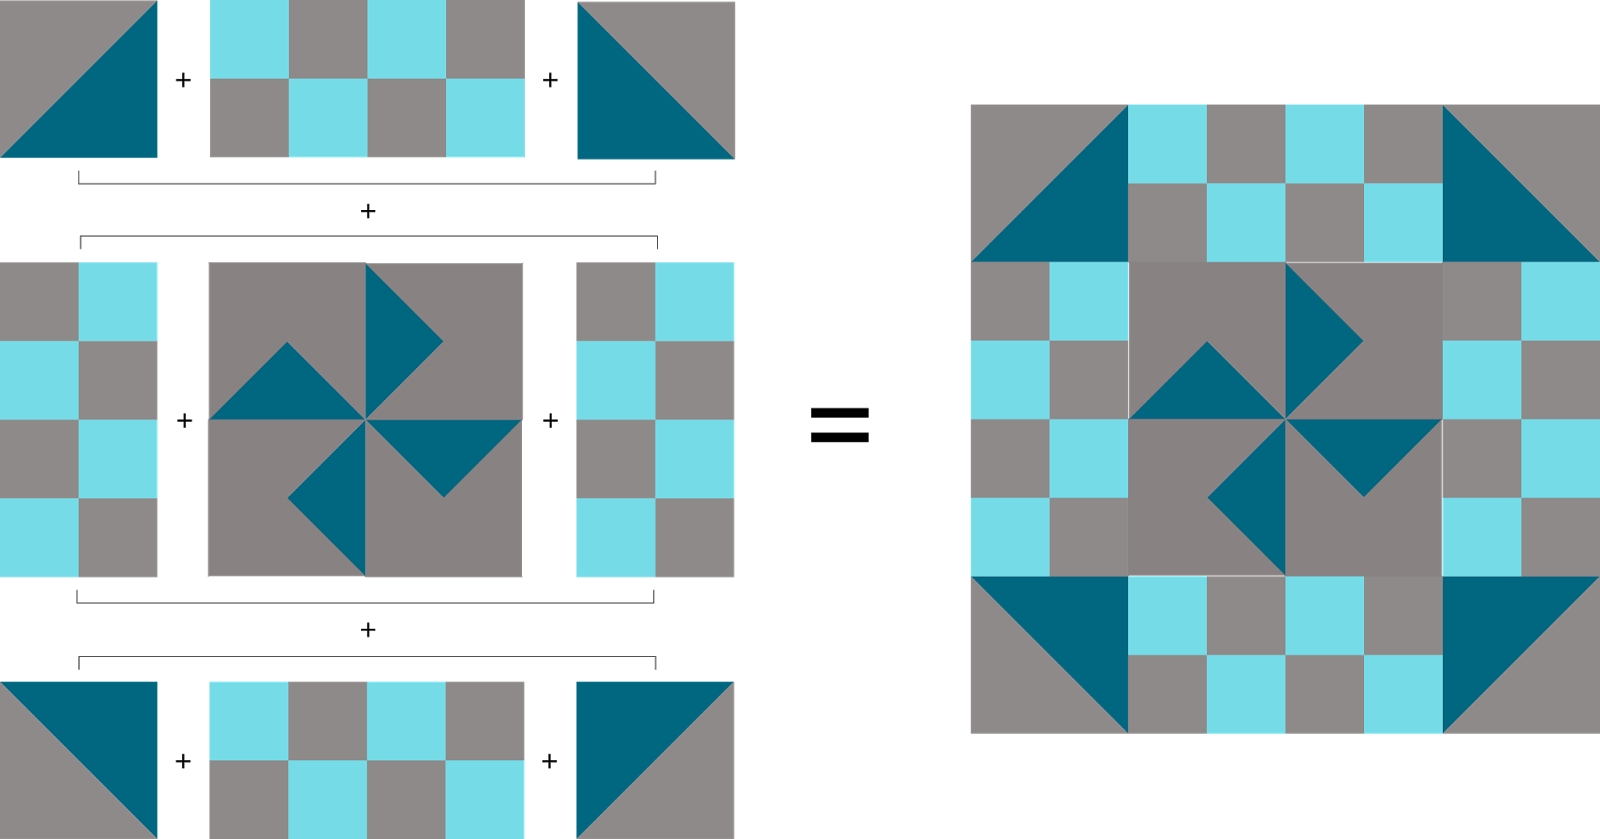
Pinwheel Assembly:
{Step 1} Use the 4
QST units to assemble the center pinwheel following the diagram below.

8-Patch Assembly:
{Step 1} Using 4
Shadow squares (2” x 2”) and 4 Sky squares (2” x 2”), assemble the 8-Patch
following the diagram below.

{Step 2} Repeat
Step 1 three times for a total of 4 8-Patches.

Berryburgh Block Assembly:
{Step 1} Assemble
the block like a basic 9-Patch following the diagram below.
There you have it!
You have completed a Berryburgh Block! If you make this block, I would love to
see it! Be sure to tag me on Instagram (@123quilt) and use the hashtag
#BerryburghBlock123quilt. Or you can email me (sarah123quilt@gmail.com) with a photo
of your block or a link to your blog post. I'd love to share your blocks on my social media!
========
You may have noticed that my tutorial is shown in the blue colorway and my actual block was made in the purple colorway. I did that specifically so you could see the block both ways! Truthfully, Berryburgh block would look great in a lot of colorways! The block would also look great using prints. You could use this block in a sampler quilt or make an entire quilt with this one block. There are so many possibilities!
========
Be sure to check out the other amazing blocks being presented today! Also, swing by Yvonne @ Quilting Jetgirl for a GIVEAWAY!!!
Today's Schedule
Tuesday, September 13th
Host: Cheryl @Meadow Mist Designs
Miranda @I Have Purple Hair
Jennifer @The Inquiring Quilter
Sarah @123 Quilt (that's ME!!!)
Leanne @Devoted Quilter
Jen @Patterns By Jen
Jennifer @RV Quilting
Amanda @Quiltologie
Sharon @Yellow Cat Quilt Designs
Jen @A Dream and A Stitch
Jen @Faith and Fabric
Carole @Carole Lyles Shaw
Stephanie @Quilt’n Party
Susan @Sevenoaks Street Quilts
Katrin @Now What Puppilalla
Amista @Hilltop Custom Designs
Nicole @Handwrought Quilts
Marla @Penny Lane Quilts
Silvia @A Stranger View
Sarah @Smiles Too Loudly
Carrie @the zen quilter
Mary @Quilting is in My Blood
Velda @GRANNYcanQUILT
Yesterday's Schedule
Monday, September 12th
Host: Yvonne @Quilting Jetgirl
Abigail @Cut & Alter
Janice @Color, Creating, and Quilting!
Lorinda @Laurel, Poppy, and Pine
Melva @Melva Loves Scraps
Renee @Quilts of a Feather
Kathryn @Upitis Quilts
Kim @Leland Ave Studios
Amanda @this mom quilts
Holly @Lighthouse Lane Designs
Irene @Patchwork and Pastry
Jennifer @Dizzy Quilter
Karen @Tu-Na Quilts, Travels, and Eats
Anne @Said With Love
Suzy @Adventurous Applique and Quilting
Sharla @Thistle Thicket Studio
Kathleen @Smiles From Kate
Amanda @Gypsy Moon Quilt Co.
Sarah @Sarah Goer Quilts
Chelsea @Patch the Giraffe
Jinger @Trials of a Newbie Quilter
Anja @Anja Quilts
Daisy @Ants to Sugar
Tomorrow's Schedule
Wednesday, September 14th
Host: Stephanie @Late Night Quilter
Kathy @Kathys Kwilts and More
Paige @Quilted Blooms
Mary @Strip Quilts Pass it On
Allison @Woodberry Way
Seven @The Concerned Craft
Olusola @Alice Samuel’s Quilt Co.
Ann @Brown Paws Quilting
Jodie @Persimmon + Pear
Vicki @Orchid Owl Quilts
Kitty @Night Quilter
Francine @Mocha Wild Child
Shelley @The Carpenter’s Daughter who Quilts
Jayne @Twiggy and Opal
Geraldine @Living Water Quilter
Shannon @Shannon Fraser Designs
Lisa @Sunlight In Winter Quilts
Jessica @Quilty Habit
Cassandra @The (not so) Dramatic Life
Deanna @Stitches Quilting
Denise @Craft Traditions
========
Linking up with:
========
Until next time!
- Sarah
This is gorgeous! I love the more restricted pallette you've used!
ReplyDeleteSarah, this is beautiful. A very nice block. Well done you!
ReplyDeleteHehe - I want to visit Berryburgh! Great block
ReplyDeleteI want to visit there too! :P
DeleteFantastic block, Sarah! Great tutorial!
ReplyDeleteGreat blick and a beautifully written tutorial. Yay.
ReplyDeleteThis is oh so beautiful in both color way, kudos to you 🙌
ReplyDeleteVery fun block!
ReplyDeleteThanks for this beautiful block. To me it is full of energy and whimsy. Great tutorial too.
ReplyDeleteThanks for this beautiful block. To me it is full of energy and whimsy. Great tutorial too.
ReplyDeleteVery interesting block-very fun! Thank you
ReplyDeleteGreat tutorial and a gorgeous block!!
ReplyDeleteGreat block, and your tutorial looks awesome!
ReplyDeleteI like that you show the block in several colorways. The checkerboard edge is a lot of fun, too. Thank you so much for joining the hop!
ReplyDeleteLovely block Sarah, and your tutorial is very easy to follow. Great movement in the block.
ReplyDeleteSmiles
Kate
Oh what a fun block. The little squares ARE kind of like little berries, and I love the movement in it. Super job!
ReplyDeleteOh Sarah - this is such a pretty block - just love it in the pink/purple colour way!!
ReplyDeleteBeautiful! And you did a great job explaining / showing the block assembly!
ReplyDeletethis is such a lovely block. thanks for sharing.
ReplyDeleteBeautiful block and wonderful tutorial! Great illustrations.
ReplyDeleteYou created such a pretty block. I like you separated the fabrics into 2 colorways. Great tutorial as well!
ReplyDeleteLove how you arranged the colors in your block and your tutorial is REALLY well done!
ReplyDeleteAnother pretty, but complicated block.
ReplyDeleteThis is a fun block, Sarah! I love the pinwheel in the middle :)
ReplyDeleteWonderful block! I haven't seen too many yet that didn't use all of the colors. I think it is really striking in your block. Great job!
ReplyDeleteGorgeous block ,the middle caught my eye and great tutorial!
ReplyDeleteDelightful block.
ReplyDeleteSarah this is a wonderful block. I love the illustrations for your tutorial as well. Are they done in EQ7?
ReplyDeleteLove your block - thanks for a great tutorial!
ReplyDeleteAll the blocks are fantastic and the colors too. Can't wait to see the quilt with all these great blocks.
ReplyDeleteYou did a beautiful job and I am a big fan of pinwheels, they make me happy!
ReplyDeleteWhat a beautiful block. I like the limited palette you chose to use and your diagrams and illustrations show the assembly so clearly!
ReplyDeleteOooh, Sarah, I love this block! I love the way the checks border the tiny pinwheel! Very clever! And your diagrams are great!
ReplyDeleteGreat Block. I think it would go great with Jen's from The INquiring Quilter!
ReplyDeleteThis is a great block. Very nice in both colourways.
ReplyDeleteYour block is so sweet, Sarah! I love the combination of the pinwheel and checkered pattern together! Beautiful work!
ReplyDeleteI really like your block. You did a wonderful job on your tutorial.
ReplyDeleteThank you for showing the quarter triangle block! I am definitely going to give that technique a go. Super gorgeous block!
ReplyDeleteSuch a cute block, love the pin wheel in the center. Great work!
ReplyDeleteThis is a really clever block design and perfect for showing off those scrumptious solids. Thanks so much for sharing the tutorial, Sarah!
ReplyDeleteGreat block! I love it in both colorways. The checkerboard border was very clever!
ReplyDeleteHi Sarah, it's been a crazy week, and I'm just getting around to commenting on a few more blog posts. I liked how you showed the two different colorways, and I could see a quilt in both colorways like Jennifer@Inquiring Quilter showed in her tutorial. I really like how professional your tutorial looks. I thought about asking you what program you use, but realistically, I'm not going to spend the money or the time to buy and learn a complicated graphic arts program. Anyhoo, I appreciate your style! Take care, Mary.
ReplyDeleteVery nice block!! It's on my "must make" list! I have to ask...how did you write up your tutorial with the drawings instead of pics. Did you use a special program? Thanks for the pattern.Karen
ReplyDeleteYes, this is a nice block! The tutorial is well done
ReplyDelete