

I'm so excited to be part of this wonderful block hop sponsored by Paintbrush Studio and hosted by Yvonne of Quilting JetGirl, Cheryl of Meadow Mist Designs, and Stephanie of Late Night Quilter! Over 30 bloggers are designing a new quilt block using the same Fat Quarter bundle of Painter's Palette solids by Paintbrush Studio. That's over 30 new designs in just 3 days!
The hosts of this hop curated this gorgeous bundle and are calling it "Ocean Sunrise."

Paintbrush Studio has generously supplied each participant with a Fat Quarter each of Midnight, Daydream, White, Peach, Coral, and Bordeaux. Each participant was required to design a 12 1/2" by 12 1/2" (unfinished) quilt block that included at least three of the fabrics from the bundle.
Presenting...
OBX Sunrise

General Notes:
·
OBX
Sunrise is a 12” finished (12 ½” unfinished) quilt block. The block is made up
of two units (two END Units and one MIDDLE Unit.)
·
This
block is made with Half Rectangle Triangles (HRT’s.) There are many ways to
make HRT’s. Feel free to use your favorite method but PLEASE NOTE that the
cutting measurements given are for the method outlined in this tutorial.
·
¼”
seams are used throughout the construction of this block.
·
This
block is named for the beautiful sunrises that can been seen from the Outer
Banks (OBX) in North Carolina.
Materials Required:
·
1
– FQ (fat quarter) each, Painter’s Palette solid cotton fabric by Paintbrush
Studio in Peach, Coral, Bordeaux, Midnight, and White.
·
Basic sewing supplies (sewing machine,
thread, scissors, cutting mat, ruler, rotary cutter, marking pen or pencil,
etc.).
Cutting Instructions:
From
Peach:
Cut 2 – 3” x 5” rectangles
From
Coral:
Cut 2 – 3” x 5” rectangles
From
Bordeaux:
Cut 2 – 3” x 5” rectangles
From
Midnight:
Cut 2 – 1 ½” x 12 ½” strips
From
White:
Cut 2 – 1” x 12 ½” strips
Cut 1 – 1 ½” x 12 ½” strip
Cut 6 – 3”
x 5” rectangles

Half Rectangle Triangle Assembly:
**NOTE**
This method yields 2 LEFT-facing HRT’s.
Step
1:
Lay 1 White rectangle (3” x 5”) and 1 Peach
rectangle (3” x 5”) side by side, keeping the White rectangle on the left.

**NOTE** If using
prints, make sure the fabric on the left is WRONG side facing up and the fabric
on the right is RIGHT side facing up.
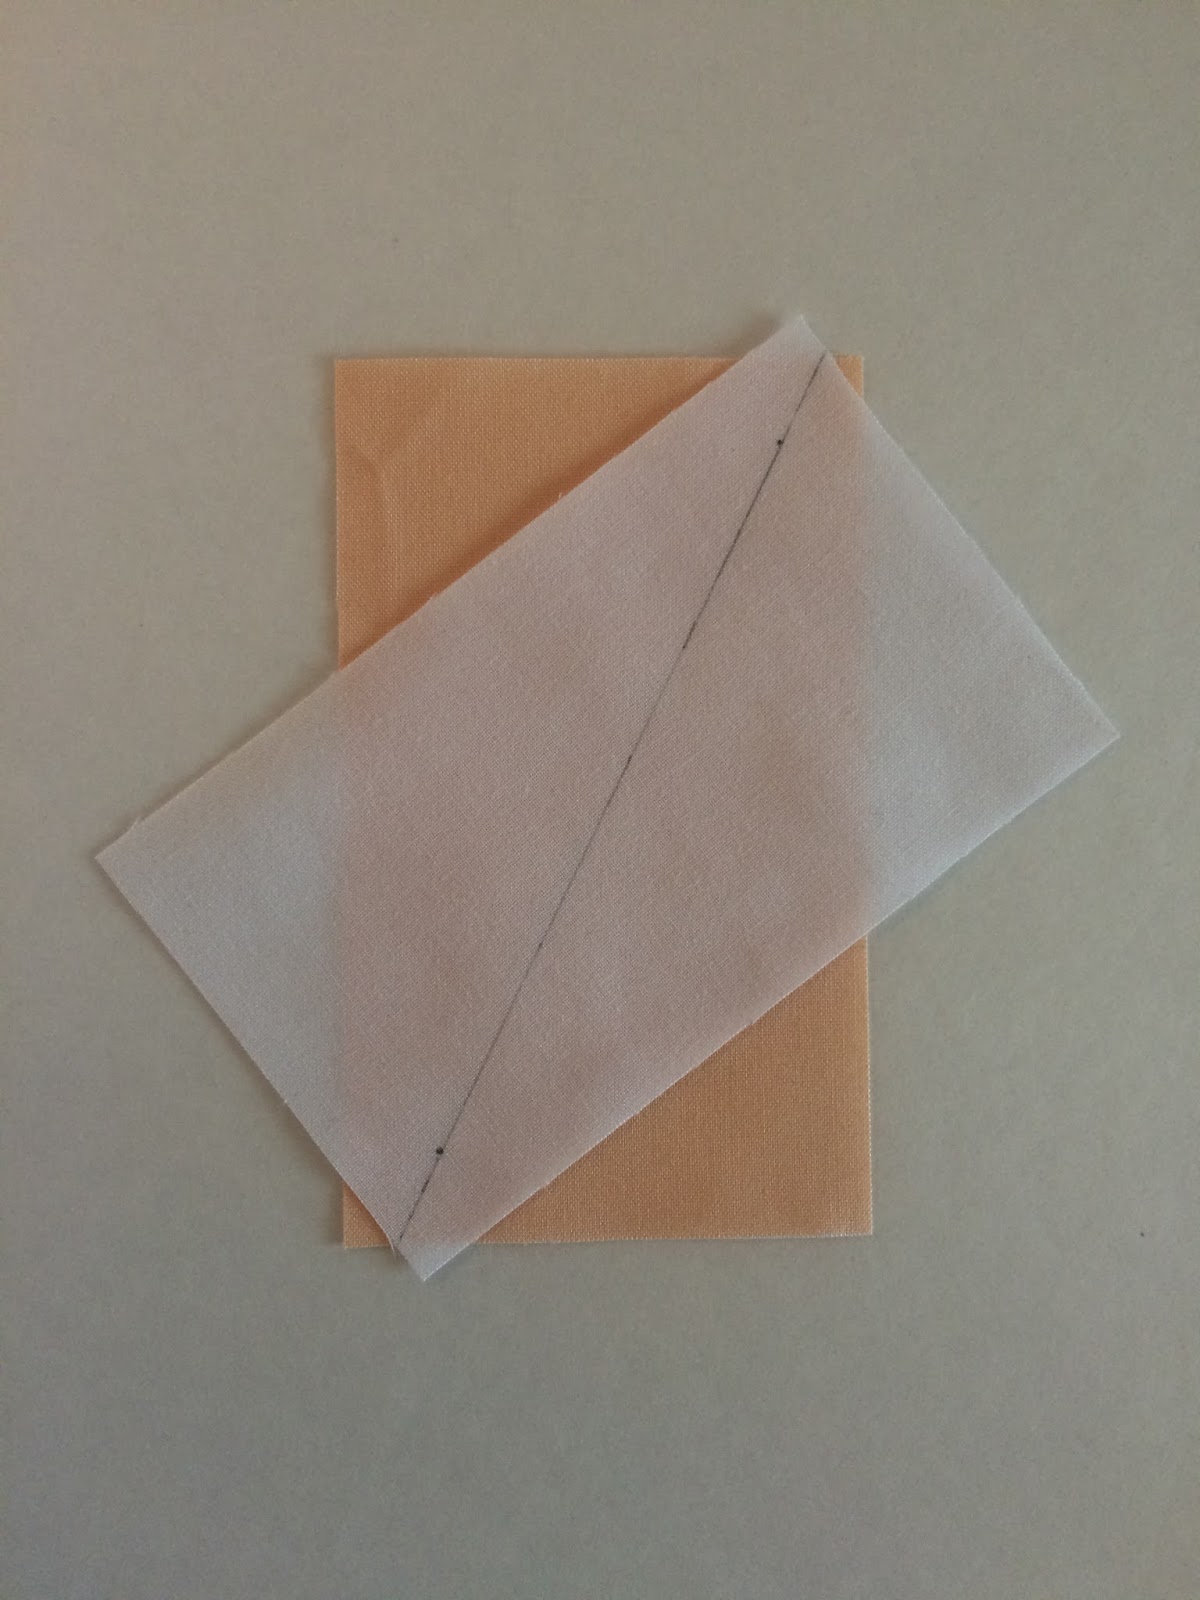
Step 2:
Using a marking pen or pencil and a ruler,
mark a dot ½” in from the TOP LEFT corner of the White rectangle. Mark another
dot ½” in from the BOTTOM RIGHT corner of the White rectangle.


Step
3:
Using a marking pen or pencil and a ruler,
mark a dot ½” in from the TOP RIGHT corner of the Peach rectangle. Mark another
dot ½” in from the BOTTOM LEFT corner of the Peach rectangle.

Step
4:
On each rectangle, use a marking pen or
pencil and a ruler to draw a sew line connecting the dots.

**NOTE**
Marked lines will not go directly through the corners.
Step
5:
Move the White rectangle on top of the Peach
rectangle and rotate so the lines match up.

Step 6:
Pin to secure. Then sew a seam ¼” in from
either side of the sew line.

Step
7:
Use scissors or a ruler and rotary cutter
and cut along the sew line.

Step
8:
Open and press HRT’s to reveal two
LEFT-facing HRT’s.

Step
9:
Trim each HRT to 2 ½” x 4 ½”.
-
To trim HRT, line up the top of the diagonal
line of the HRT with the ¼” intersection of the ruler and the bottom of the diagonal
line of the HRT with the 2 ¼” and 4 ¼” intersection of the ruler.

-
Use a rotary cutter to trim the top and side
of the HRT. Flip the HRT and line up the trimmed edges with the 2 ½” mark and
the 4 ½” mark on the ruler.

-
Trim remaining sides.

Step 10:
Repeat Steps 1 through 9 with the remaining
5 White rectangles (3” x 5”), 1 Peach rectangle (3” x 5”), 2 Coral rectangles
(3” x 5”), and 2 Bordeaux rectangles (3” x 5”). Yields 12 total HRT’s (2 ½” x 4
½”) – 4 Peach, 4 Coral, and 4 Bordeaux.

End Unit Assembly:
Step
1:
Sew together 2 Peach HRT’s, 2 Coral HRT’s,
and 2 Bordeaux HRT’s as shown in the picture below.

Step
2:
Repeat with the remaining 2 Peach HRT’s, 2
Coral HRT’s, and 2 Bordeaux HRT’s for a total of 2 End Units. Each End Unit
should measure 4 ½” x 12 ½”.

Middle Unit Assembly:
Step
1:
Sew together 2 White strips (1” x 12 ½”), 2
Midnight strips (1 ½” x 12 ½”), and 1 White strip (1 ½” x 12 ½”) as shown in
the picture below. The Middle Unit should measure 4 ½” x 12 ½”.


Block Assembly:
Step
1:
Assemble the block as shown in the picture
below.

Step
2:
Square up the block to 12 ½” x 12 ½” if
needed.
========
I really love this block and I think it looks amazing on repeat!

I definitely want to make this one soon! I hope you enjoyed this tutorial and if you make an OBX Sunrise block I would love to see it!
========
Be sure to check out the other participants in the 2016 Paintbrush Studio New Block Blog Hop!
Monday, March 28th
Host: Yvonne @Quilting Jetgirl
Jess @Quilty Habit
Silvia @A Stranger View
Cristy @Love You Sew
Kelly @Quilting It Out
Renee @Quilts of a Feather
Bernie @Needle and Foot
Terri Ann @Childlike Fascination
Chelsea @Patch the Giraffe
Mary @Quilting is in my Blood
Diana @Red Delicious Life
Sarah @123 Quilt - YOU ARE HERE!
Tuesday, March 29th
Host: Cheryl @Meadow Mist Designs
Kim @Leland Ave Studios
Andrea @The Sewing Fools
Cassandra @The (not so) Dramatic Life
Stephanie @Quilt’n Party
Irene @Patchwork and Pastry
Tish @Tish’s Adventures in Wonderland
Abby @Hashtag Quilt
Sarah @Smiles Too Loudly
Carrie @The Zen Quilter
Wanda @Wanda’s Life Sampler
Jayne @Twiggy and Opal
Your OBX Sunrise block and tutorial is wonderful, Sarah. I really like the color gradient, and the secondary pattern for the quilt top you show is wonderful. Thank you so much for joining the hop!
ReplyDeleteSuper block...great instructions! I haven't seen a Mid-Atlantic sunrise in decades! Thanks for the recollection :) (I grew up in WilliamsburgVa)
ReplyDeleteVery cool block and oh, how I miss those beautiful OBX sunrises! It brings back great memories.
ReplyDeleteFabulous block!! I don't make HRT's often, but your tutorial is perfect and makes me want to start right now!
ReplyDeleteOh, I love that quilt layout! You make HRTs easy! :)
ReplyDeleteGood tutorial.
ReplyDeleteI love this block. It just went to the top of the list!
ReplyDeleteGreat tutorial, and a great block!
ReplyDeleteI love this! I have a HRT design that is waiting to be worked on.I love your clear directions on it. Beautiful!
ReplyDeleteThis is a great tutorial for HRTs. They always challenge me so. I love how this block looks in a quilt.
ReplyDeleteGreat block and tutorial! Thanks for sharing.
ReplyDeleteLovely block - I'm glad you played with the ombre factor of the color palette and the HRT are such a fun surprise; they give the block such great movement. Thanks for sharing!
ReplyDeletesuch a lovely and fun block. thanks for sharing.
ReplyDeletequilting dash lady at comcast dot net
Very neat block, I love the way it looks when it's tiled--so much movement!
ReplyDeleteWhat a cool quilt this block will make. Very striking block.
ReplyDeleteWhat a great block! Love it!
ReplyDeleteFabulous block Sara!! Did some HRTs last summer and had a serious love...now you've reminded me!
ReplyDeleteVery cool block! I've never tried to make a HRT before, so I really enjoyed this tutorial. You have showed me something new today.
ReplyDeleteThis block is a WINNER! I love the HRT's! Great job!
ReplyDeleteThis is such a great block! I love the color gradient triangles against the strong stripes!
ReplyDeleteoh wow, I love your block!! and the colors are really perfect for it! I can easily imagine how luscious it would be in linens :) XX
ReplyDeleteVery cool block, and I love your incredibly detailed tutorial. Take care, Mary.
ReplyDeleteThe block is great and makes some interesting secondary patterns in the quilt. Nice.
ReplyDeleteSmiles
Kate
Thanks, Kate!
DeleteAnother gorgeous block on this New Block Blog Hop and I love that you included HRTs that make many unnecessarily nervous; it's great to take the mystery and fear out of a technique for others isn't it? Thanks so much for linking up at Sew Cute Tuesday today - Chris (guest host) @madebyChrissieD :D
ReplyDeletegreat block, great tutorial.. thanks
ReplyDeleteWhat a great tutorial. There are so many BOM, quilt-alongs, etc out there, but sadly not enough hours in the day to take part in all of them. Lovely block!
ReplyDeleteLove these blocks and the colorway. crystalbluern at tds dot net
ReplyDeleteLove your block. The tutorial is good. I had not seen this method of piecing half rectangles. Thanks!
ReplyDeleteFantastic!!!All these blocks are simply stunning! I have yet to try half rectangle triangles but just might give it a go here. Your quilt layout is excellent and I really like the secondary motif that is created at the intersections of the blocks!
ReplyDeleteThanks! I hope you do give HRT's a try. They are a lot of fun!
Delete